

Created a Hack So I Can Send a Drip Emails to New Substack Subscribers
I wanted to share a little “Drip Series Zap” I built using Zapier to help Substack authors add a drip series to their content engine.


This bonus post is a bit different—I wanted to share a little “Drip Series Zap” I built using Zapier to help Substack authors add a drip series to their content engine.
The problem:
Our Substack had just crossed 1,500 subscribers (and growth is actually accelerating). The Substack is meant to be a lead gen tool for our consulting business. But there’s zero mention of the consulting business in our content.
The solution:
Like any good CMO, I wanted to create a drip series so when new folks subscribe, the first 2-3 emails orient them on what we do and how we can help, in-between all the [hopefully] high-value content.
The wrinkle:
Turns out Substack provides no way to send a drip series. Just a single welcome email.
And, because they I guess they hate RevOps people (like me), they don’t have a public API or an integration with tools like Zapier, Mailchimp, etc.
The solution:
I’d have to hack something.
I found other people online who had figured out a hack.
I ended up spending like 2 hours banging my head before getting it done.
Here’s what I put together, with screenshots, so you can hopefully do this in like less than 20 minutes.
Here are the steps summarized:
Create a Gmail Label / Filter
Create a Zap and Use that Filter as the Trigger
Add a “Formatter” Step to Extract the Email Address
[Optional]You can choose to store all subscribers in a Google Sheet.
Add a “Delay” Step
Create “Send Email” Step
Repeat the Delay and Email Steps for Drip #3 and beyond
If you think this could be helpful to you, read on.
1. Create a Gmail Label / Filter
I found this method cleaner/more reliable than implementing search filters inside Zapier itself.
Make sure to save the filter by hitting “Create filter” and then saving it as a “Label” (argh, Gmail confusing feature-naming 🤷🏽).
Here’s the filter I created:

2. Create a Zap and Use that Filter as the Trigger
You can see the entire flow below, but the main thing to pay attention to is the configuration:
Set Trigger = New Labeled Email
Connect Your Gmail Account
Set Configuration to whatever you named your Label/Filter

3. Add a “Formatter” Step to Extract the Email Address
Turns out that with Zapier’s AI functionality this was easy to figure out.
I asked and it pointed me toward the “Formatter” and suggested a function called “Extract email.”
Wowza.
For the input, look for a field named “Body Plain.”


4. [Optional]You can choose to store all subscribers in a Google Sheet.
I wanted to do this so I could turn on the zap and see exactly what emails were being extracted before I actually added a “Send Email” step.
5. Add a “Delay” Step
Since Substack has a built-in welcome email, I only need Zapier to send Emails #2 and #3 in my Email Drip Series. So I added a 2-day delay between a New Subscription and the first Zapier-powered Email-send.
There are a couple different types of delays. I chose “Delay for” and chose 2 days.

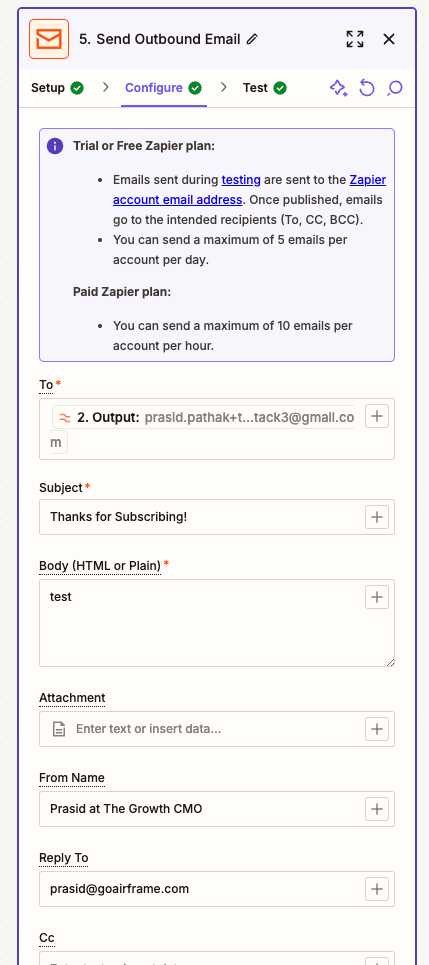
6. Create “Send Email” Step
You’ll notice I haven’t actually taken the time to drop-in a well-formatted email yet. I’m not 100% sure how reliable Zapier’s HTML email capability will end-up being. If so I’ll come back and update here.
7. Repeat the Delay and Email Steps for Drip #3 and beyond
You’ll notice I haven’t actually taken the time to drop-in a well-formatted email yet. I’m not 100% sure how reliable Zapier’s HTML email capability will end-up being. If so I’ll come back and update here.
Voila!
3 months later, I would love to know how this is going. Drip emails within Substack would be so helpful